
DL485D4 - DIMMER LED 4 CANALI
4-channel LED Smart Dimmer with push-button control or via the Domoticz home automation system
COMMON AND OPTIONAL FEATURES OF THE DIMMER FAMILY
3/4 Canali indipendenti oppure sincronizzabili
per pilotare striscie RGB / RGBW
Comandi intuitivi, avanzati e personalizzabili
Soft ascent and descent ramps
Configurable ramps both up and down
Maximum ON and OFF times
For staircase and flashing lighthsi
Gestione accensioni provvisorie
Selezione rapida peri minima e massima luminosità
Advanced shutdown for grouped channels
Different ways of switching off the grouped channelsi
Output status setting upon arrival of the power supply
It is possible to set the power on state when the power supply arrives
Maximum and Minimum brightness settable
Per evitare surriscaldamenti e velocizzare le impostazioni
Flashing
Canale lampeggiante con tempi ON e OFF separati
Chormotherapy
For saunas, showers, aquariums, illuminated signs
High output power
Canali in uscita parallelizabili a coppie per raddoppiare la corrente
Flessibiità tensioni di alimentazione strip LED
La tensione di alimentazione strip per un canale può essere diversa da quella di un altro canale
Dimmer controlled by Domoticz or on DMX bus
The channels can be controlled by the home automation system
Several predefined settings
For quick installation
All configurations can be carried out by the user by means of an on-board button and programming LED
Presentation
MyTek Smart Dimmers are devices designed to meet the common needs envisaged for a dimmer, but also to have further added functions compared to normal dimmers on the market, while maintaining a simple and intuitive use.This is available in different versions: with 1,3,4 channels, as dimmer, as dimmer + DMX512 option, only as DMX512 dimmer, as dimmer + DL485 option.
Brief description of the operation of the smard dimmer, for more details and as regards the DMX part select the WIKI link below.
Many commercial dimmers reverse the sense of dimming each time the button is pressed, and this can be inconvenient
because the user may have changed or not remember the last command given some time before, so he will have to press and observe the direction of variation and eventually release and press the key again to correct.
With the MyTek Smart Dimmer, the direction of variation (increase / decrease) can be similar to that described above, i.e. reverse the direction of variation with each press, or directly controlled by the user in the desired direction through the way in which the button is pressed.
With the Smart Dimmer, when the button is pressed, the direction is predefined increasing and leaving and pressing again immediately reverses the direction each time, so you know in advance what sense of variation you get.
If you want to go up and then go up again without inversion, just wait a second after the first press to reset the button in the up direction and press again.
If, on the other hand, you want to give a descent command, a short pressure is enough followed immediately by a prolonged pressure during which you descend.
However, it is possible to set the dimmer so as not to automatically switch to the default direction and behave like the other dimmers that remember the last direction.
By keeping the button pressed, you can cycle between a minimum and a maximum or between off and a maximum, with programmable pause at the ends, or select the option to stop at maximum or minimum without cycling.
If desired, it is also possible to have separate up and down commands.
All the brightness variations controlled by LEDs already turned on are usually stored and overwrite the previous memory, but there are cases in which this storage is not desirable, as in the cases of temporary switching on for immediate needs.
Use cases of temporary ignitions:
- you enter a room where you want maximum light immediately (two short and close presses are given)
- you enter a room where someone sleeps and you want sufficient minimum light (you keep the button pressed and release at the desired level)
- you want to immediately bring the level to 50% because it is believed that this level is suitable for the needs of the moment (a short press followed immediately by a prolonged one)
The levels memorized by the button for all the channels are saved as well as all the dimmer parameters set and will not be lost if there is no power supply, instead the on / off status of the various channels is not memorized if there is no power supply.
The commands for temporary ignitions that lead to 50% or maximum work if completed before the end of the automatic ignition ramp, so if this ramp is too fast these commands will not be usable.
To immediately memorize the maximum level starting from off, it can be turned on with the two short and close presses, then when the ramp is complete, a longer pressure is given as to increase.
To immediately memorize the minimum level, starting from off, press and hold to start from zero, release and press again to go down and leave at minimum.
Smart Dimmers come with a standard default setting, but have several configurable parameters that allow you to satisfy even unusual applications for a dimmer.
If you make an error while setting the parameters, you can use the procedure for recovering the default setting.
Settable features
- Push button operation with intuitive basic operation- Soft or immediate on and off
- Temporary switch-ons without altering the brightness levels in memory
- Possibility to set a separate maximum ON time for each channel
- Possibility to set a separate maximum OFF time for each channel
- Possibility of synchronizing 2/3/4 dimmers of the same unit by connecting the inputs together
- Possibility of synchronizing 2/3/4 dimmers of the same unit with general command to maintain the RGB or RGBW color tone
- Possibility of parallel inputs and outputs (2 + 1 if 3-channel dimmer, or 2 + 2 if 4-channel dimmer), to have double output current
- Possibility to set the maximum ON time for RGB / RGBW or staircase lights with possible shutdowns at settable times
A) with 50% attenuation for the first 1,2,3 steps and then OFF or leaving low light, or
B) switching off one channel at a time even leaving 1 or 2 channels on at the end
- possibility of blocking changes in brightness and / or blocking memory changes with a button (useful for condominium stair lights)
- Settable state of the outputs when the supply voltage is restored
- Optional second button for separate UP / DOWN commands
- Stand alone version and home automation version controlled from Domoticz or via DMX512 bus
- Division into same intensity zones to increase fault tolerance for large rooms
- Timed stair light controls with different modes for home and condominium
Examples of possible dimmer applications:
- immediate on / off (parameters 2, 3)- switching on / off with SOFT ramp (parameters 2, 3)
- switch-ons with maximum time (parameter 5)
- periodic switching on and off to simulate the presence of people in the house (parameters 5, 18, 19)
- flashing with buttons pressed (parameters 2, 3, 6)
- flashing lights or light effects (parameters 2, 3, 5, 18, 19)
- flashing which indicates that the electricity was lost and then returned (parameters 1, 2, 3, 5, 18, 19)
- slowing down controls for elderly people (parameters 4, 6, 7, 8)
- building staircase lights command with fixed memory (parameter 12)
- staircase lights command with switch-off warning (general command with max on times set on the various channels)
- shutdown notice with shutdown of one channel at a time
- switch-off notice given by brightness reduction
- incomplete shutdown that leaves a minimum intensity or a channel on
- staircase lights control with or without switch-off by button, or with time reset, or with time sum at each press
- very slow starts like in the cinema (parameters 2, 3, 4)
- brightness variation in a few steps (parameters 14, 15, 16)
- colored luminous signs or chromotherapy for wellness centers that alternate colors
- more light effects deriving from different control units with outputs in parallel and switched on / off as desired
- more light effects deriving from parallel outputs and activation / deactivation of the effect from buttons or via power supply management
- dimmer control from DL485 network and through Domoticz home automation software
- parallel dimmer inputs to obtain synchronized channels with a single button
- parallel inputs and outputs two by two for driving double currents
- RGB / RGBW color management with single buttons and master button (parameter 13)
- command added to manage UP / DOWN even with two separate buttons
NB: for the 4-channel RGBW model this function is available only for the
first 3 channels because there are only 6 input terminals, the fourth channel
it will no longer be usable or it can be used as a fixed intensity light
upon energy return with possible maximum ignition time or as a flashing output
- soft start and stop with switch or with clean contact of presence sensor
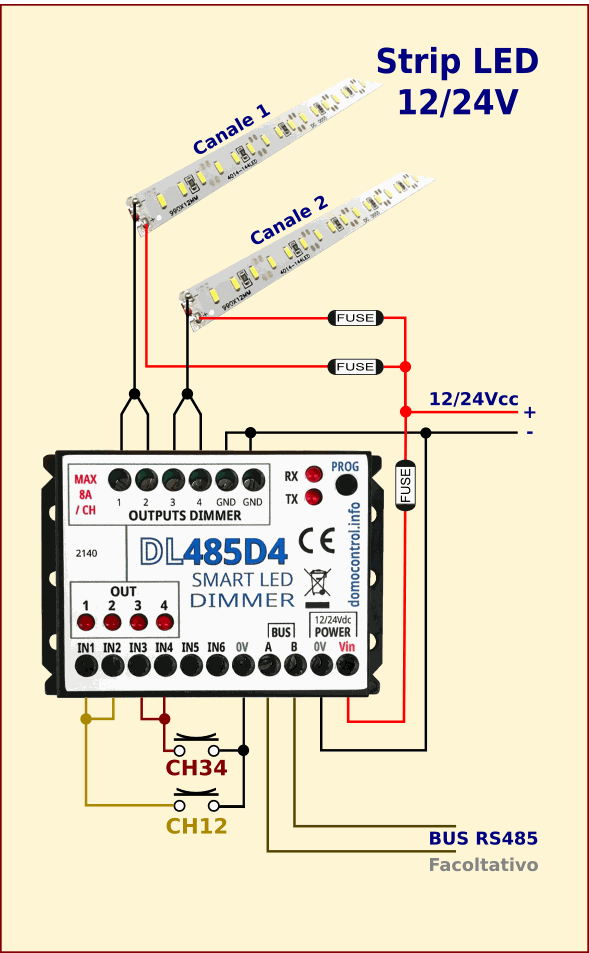
Schematic diagram for the connection for 4-channel dimmers
Connect the buttons to the input terminals, possibly with the Master button, as shown in the diagram, connect the outputs to the 12 / 24V LED strips and the 12 / 24V DC power supply to the dimmer and + Vcc to the LED strips.
For more details on wiring, refer to the WIKI section accessible through the WIKI link at the bottom of the page.
On board the MyTek Smart Dimmer there are a button and 2 LEDs to view or modify the various configuration parameters.
Caratteristiche
| Tensione in ingresso MAX: | 27Vdc (range 6..24Vdc) CORRENTE CONTINUA |
| Corrente MAX in uscita: | 8A per ciascun canale |
| Assorbimento Dimmer in StandBy: | < 10mA, a 24V |
| Tensione ingressi: | 0/5Vdc |
| Dimensioni dimmer: | 74x47x25mm |

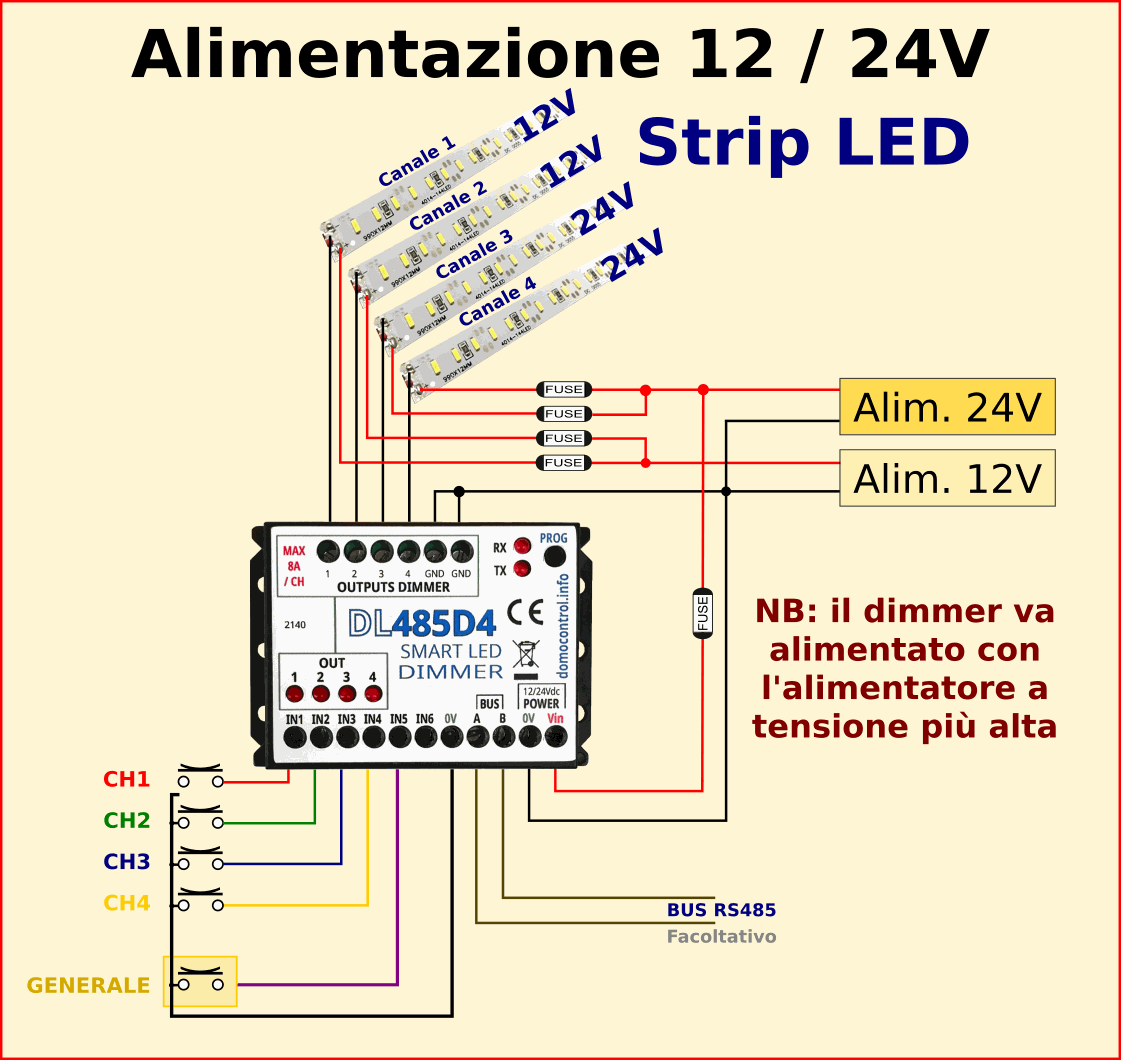
4 CANALI INDIPENDENTI CON UNICA ALIMENTAZIONE
Si possono servire 4 zone indipendenti.


3 CANALI SINCRONIZZATI SOTTO UNICO COMANDO
I 4 canali sono stati raggruppati in due gruppi, uno con i primi 3 canali e uno con solo il quarto canale.
2 CANALI A CORRENTE DOPPIA
In caso di necessità è possibile trasformare un dimmer a 4 canali in un dimmer a due canali a corrente doppia, è sufficiente fare il parallelo degli ingressi dei canali 1 e 2 per sincronizzarli, poi le due uscite 1 e 2 possono essere unite tra loro per avere un'unica uscita a corrente doppia oppure andare a due carichi distinti.
Lo stesso si può fare con la coppia di canali 3 e 4 oppure possono restare indipendenti o avere solo gli ingressi uniti, ma non le uscite.
E' possibile anche fare il parallelo di tutti e 4 gli ingressi per avere i 4 canali sincronizzati, quindi con un unico comando si comandano tutti insieme con la stessa intensità, ma l'hardware interno permette il sincronismo esatto istantaneo necessario per poter fare il parallelo delle uscite solo tra la coppia 1 e 2 e tra la coppia 3 e 4.
Quando si fa il parallelo delle uscite bisogna ricercare una equa ripartizione della corrente dei due canali, allora il parallelo delle uscite va fatto utilizzando due spezzoni di filo uguali in materiale, lunghezza e sezione, che poi si riuniranno sul filo di uscita o ancora meglio direttamente sul carico, e va evitato il cavallotto tra i due morsetti di uscita perché rende asimmetrico il prelievo di corrente perdendo cosi la equa ripartizione.
Quando si fa il parallelo degli ingressi i canali collegati insieme si sincronizzano come intensità, e c'è un dimmer master, che è quello col numero di canale più basso nel gruppo, mentre gli altri dimmer replicano il master, perciò gli eventuali parametri dimmer da impostare saranno solo quelli del dimmer master.
Se si fa il parallelo dei 4 ingressi il dimmer master sarà quello sul canale 1, se invece si fanno due coppie distinte di ingressi, la coppia 1,2 e la coppia 3,4, ci saranno 2 dimmer master, il canale 1 per la prima coppia e il canale 3 per la seconda coppia.
CANALI CON COMANDO MASTER
È possibile riunire 2 o 3 o 4 canali sotto il comando master.
I canali non riuniti restano indipendenti, mentre quelli riuniti possono essere comandati separatamente attraverso i loro ingressi e poi il comando master li comanda tutti insieme mantenendo le proporzioni, quindi si possono ad esempio unire solo i canali 1 e 2 e avere due strisce una calda e una fredda, impostare la tonalità voluta e poi comandarle col master, oppure si possono avere i canali 1,2,3 su una striscia RGB e il quarto canale libero, oppure tutti e 4 i canali su una striscia RGBW.
Se si usano tensioni di alimentazione diverse l'elettronica del dimmer va alimentata con la tensione maggiore, ma se si guasta proprio quell'alimentatore si spegne tutto.
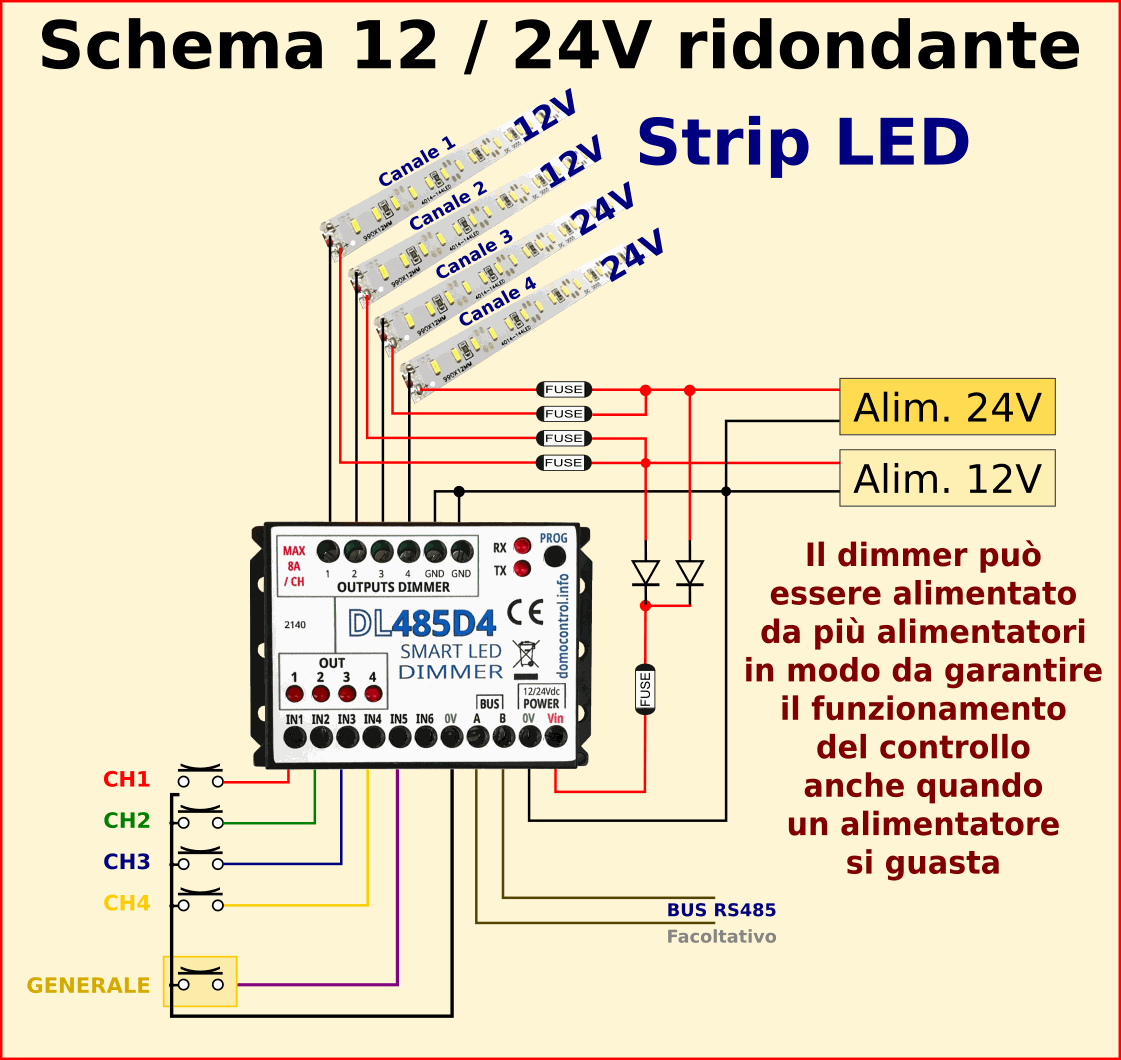
DUE ALIMENTAZIONI PER MAGGIORE AFFIDABILITÀ
Le due alimentazioni possono avere la stessa tensione oppure diversa, i diodi aggiunti consentono di alimentare l'elettronica quando almeno uno dei due alimentatori funziona e selezionano automaticamente la tensione maggiore tra le due.

ILLUMINAZIONE STANZA DI GRANDI DIMENSIONI
I canali sono sincronizzati tra loro per comandarli da un unico comando ed avere la stessa intensità, la sincronizzazione si ottiene attraverso l'unione dei morsetti di ingresso.
L'elettronica del dimmer viene alimentata anche se 3 alimentatori su 4 sono guasti, questo consente una maggiore tolleranza ai guasti rispetto all'utilizzo di un unico alimentatore.
Applicazione domotica in una stanza d'albergo
Questa applicazione prevede uno schermo touch con 4 livelli di luminosità, dove il cliente può selezionare il livello attraverso 4 tasti che comandano 4 contatti puliti in mutua esclusione, oppure eventualmente anche il singolo contatto in modo toggle che se attivato spegna eventuali altri contatti attivi. (Se i contatti non fossero in mutua esclusione prevale il canale con l'intensità più alta). Il passaggio tra i livelli di luminosità preimpostati avviene attraverso rampe soft, ma se ad esempio la luminosità minima fosse a intensità 1, partendo da spento non sarà possibile avere una rampa soft in accensione.
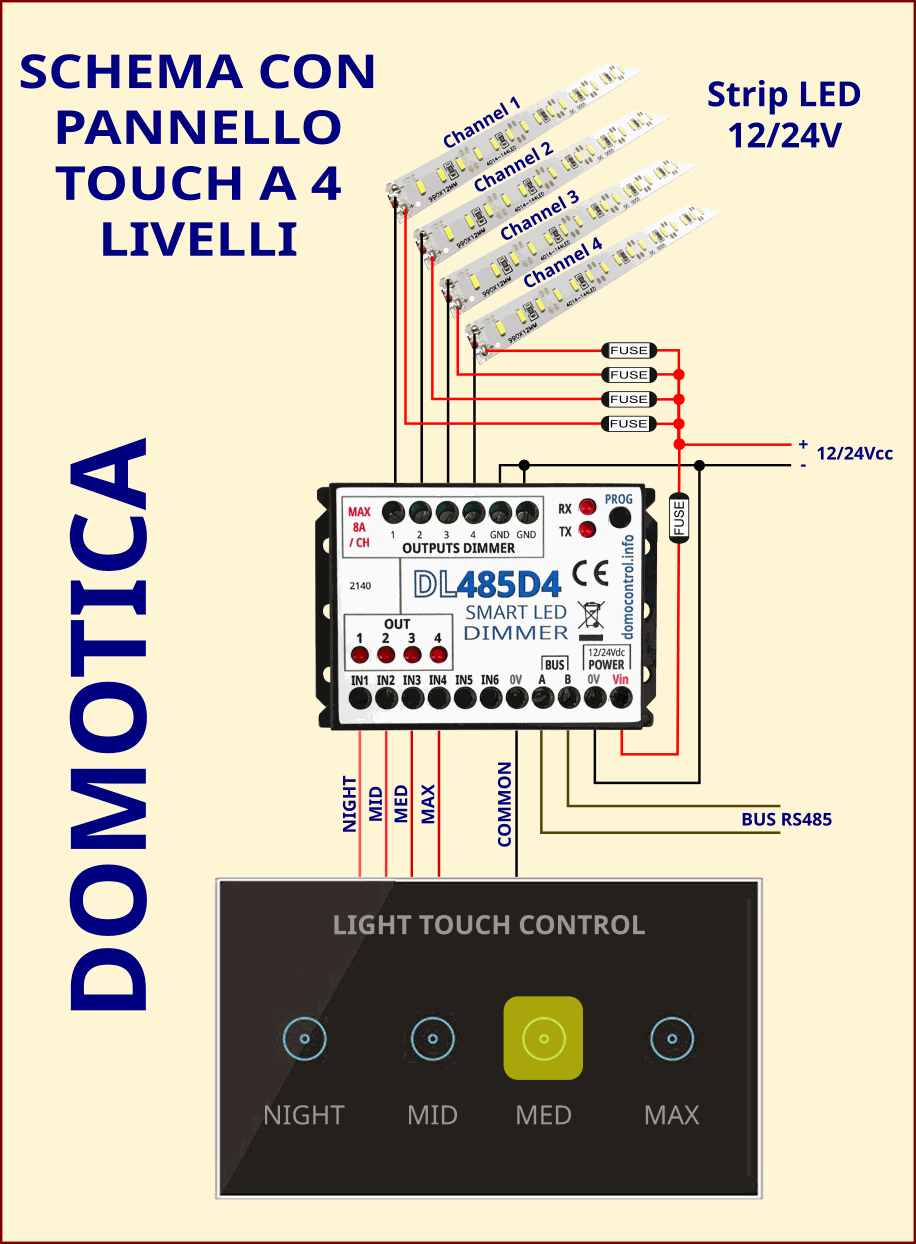
TABLE OF COMMANDS AVAILABLE TO USER BUTTON
COMMAND EFFECT
| Pressione breve a led spenti | Accende al valore in memoria |
| Pressione breve a led accesi | Spegne/viene ignorato/ricarica tempo on/somma tempo on |
| Pressione prolungata a led spenti | Parte da zero con una rampa in salita, non memorizza |
| Pressione prolungata a led accesi | Aumento/diminuzione luminosità, memorizza |
| Pressione mantenuta dopo aver raggiunto il massimo o il minimo | Fermo oppure pausa e poi inversione rampa, memorizza |
| Rilascio tasto e subito pressione prolungata: | Inversione senso di variazione, memorizza |
| Rilascio tasto di almeno un secondo: | Ripristina senso di variazione in aumento |
| Due pressioni brevi e ravvicinate a lampada spenta: | Accende il LED al massimo della luminosità, non memorizza |
| Due pressioni brevi e ravvicinate a lampada accesa: | Scende uno scalino, memorizza |
| Pressione breve seguita da una prolungata, a lampada spenta: | Porta luminosità al 50%, non memorizza |
| Pressione breve seguita da una prolungata, a lampada accesa: | Diminuzione della luminosità, memorizza |
Comando Master
Per strip LED RGB o RGBW 12/24V
No WiFi
Non è WiFi, non ha Cloud. solo tramite pulsane e/o cavo di rete RS485. Plugin per Domoticz. Libreria in Python3.
Completamente programmabile
Programmabile dall'utente tramite apposito tasto e 2 LED
Smart Dimmer LED
newdiversi prodotti per varie esigenze, configurazioni con 1, 3, 4 canali, con o senza bus DL485 e bus DMX512
dimmer dimmer 4 canali strip led strisce led